I Introduction:
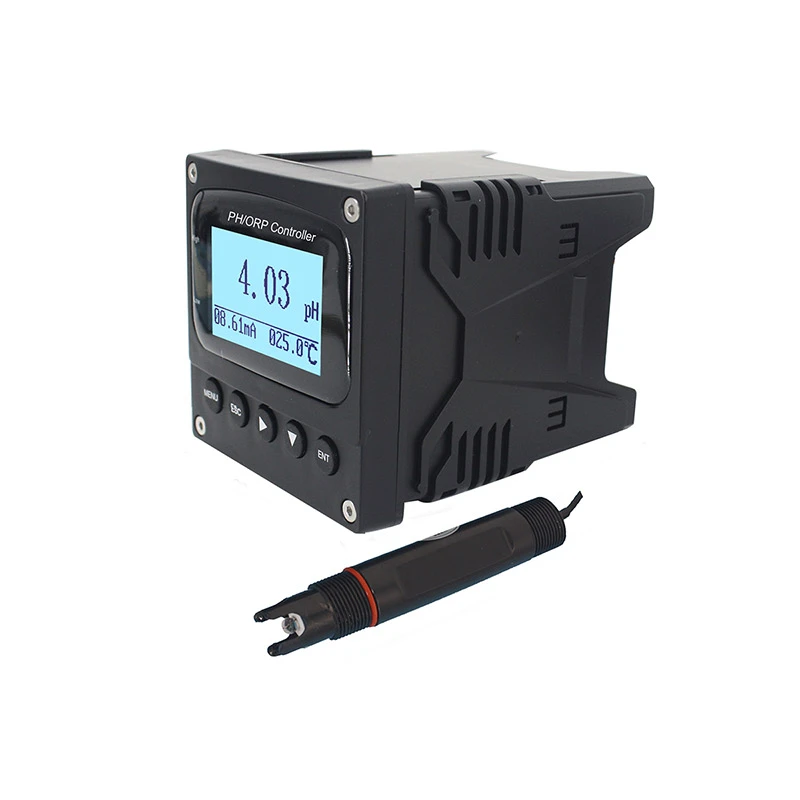
Industrial online PH/ORP controller PH/ORP-6850 is single channel PH or ORP controller. It can measure and control PH and ORP value of water continuously, the PH/ORP controller is applicable for municipal waste water treatment, chemistry, printing and dyeing, paper, medicine, plating and environmental production etc.
In accordance with the environment and characteristics of water industry, as well as the international power supply standard, considering the electricity design in special environment, the PH/ORP controller could be supplied with power 220V AC, 110V AC and safe low voltage 24V AC, 24V DC for selection.
Main Characteristics:
English language display
Measure pH or ORP, high/low limit control, current output, digital communication output (Optional)
It could be set automatic/manual temperature compensation
pH high/low limit alarm light, double relay, alarm delay could be set
Instrument mode isolated transmitting port, max circle resistance up to 750Ω
PID control to actuate and control powered variable value through 4-20 mA output (optional)
Back light of LCD could select power saving mode, timing automatic off, brightness adjust,
High performance CPU, good electromagnetic compatibility
AC input be fused.
ESD over voltage protection is available
Password management avoid non-professional person to operate
Main Technical Index
|
Measure range
|
pH(0~14 pH) ; ORP( -1200~+1200 mV)
|
|
Accuracy
|
+ 0.02 pH; + 1 mV
|
|
Resolution
|
0.01pH; 1mV(0.1mV optional)
|
|
Stability
|
≤ 0.02 pH/24hr ; ≤ 3 mV/24hr
|
|
pH standard solution
|
4.00/6.86/9.18 (standard), 4.01/7.00/10.01(optional)
|
|
Display
|
128 * 64 dot matrix LCD
|
|
Temp. compensation
|
0–120 ℃, manual / automatic, PT1000RTD
|
|
Signal output
|
One isolated 4-20mA signal output, max circle resistance 750Ω
|
|
Alarm output
|
high and low limit alarm contact (3A/250 V AC), normal open contact relay
|
|
Power supply
|
AC220V ±10%, 50/60HzR,
AC110V ±10%, 50/60Hz£,
DC24V, 0.5A,£,
|
|
Power consumption
|
≤3W
|
|
Working environment
|
(1)temperature 0~60 ℃
(2)humidity≤95%RH
|
|
Outline dimension
|
96×96×127mm(high×width×depth)
|
|
Hole size
|
93×93mm(height×width)
|
Outline dimensions and fixed Installation
Insert the controller from the front panel, install the fix clamp
(left and right), tighten with the clamp.
Chart 1 Outline dimensions and fixed installation
Wire Connection

Chart 2 Rear terminals
Connection Instruction
Note: The jumper can’t remove
1.GND : REF(Black)
2.INPUT+:PH probe signal input port (Transparent)
3.INPUT-:NC
4.GND:TEMP (White)
5.TEMP:TEMP(Green)
6.-V:NC
7. I 1+: 4-20mA output + (PH)
8. I 1- : 4-20mA output - (PH)
9. A +: RS485 +
10. B+ : RS485-
11.H1: High limit relay normal open contact
12.L1: Low limit relay normal open contact
13.COM1: High/Low limit relay common port
14.H2: undefined
15.L2: undefined
16.COM2:undefined
17.N: 220V Power connection
18.GND: Ground wire
19.L: 220V Power connection
Probe Installation
Installation method and Attention-matter
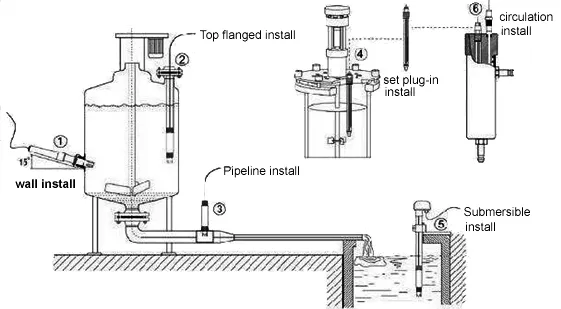
Chart 3(Several common method of installation)
In order to make sure the probe measure the real value on the pipe, bubbles should be avoided ,otherwise the value will be not accurate, please install according to the following chart:

Chart 4(attention matters of pipe installation)
Note:
(1)The probe bypass pipe of the main pipe, valve should be installed in front of it to control the water flow speed, flow should be relatively slow, generally there are steady water flow out of the outlet port is ok. The probe should be installed vertically and should be insert into the active water flow, outlet port should be higher than inlet port which could make sure the probe is in the water solution absolutely.
(2)The probe should be calibrated before installation.
(3)The measure signal is weak electric signal, its cable should be contributed separately, it is not allowed to contribute together in same cable or terminal with other power line, control line etc, which is to avoid interrupt or break the measure unit.
(4)If the measure cable should be lengthen, please contact with the supplier or indicated before place order (generally not longer than 10m)
Correct setting
Soft key function
|
Soft key
|
Key function
|
Function description
|
|

|
Menu Key
|
Enter main menu
|
|

|
Return key
|
Exit or return to the upper interface
|
|

|
Right shift key
|
Select the digit circularly,
Select sub-menu, change the digit value
|
|

|
Down shift key
|
Select sub-menu
Change the digit value
|
|

|
Confirm key
|
Confirm selected sub-menu
Confirm selected value
|
Main Interface:
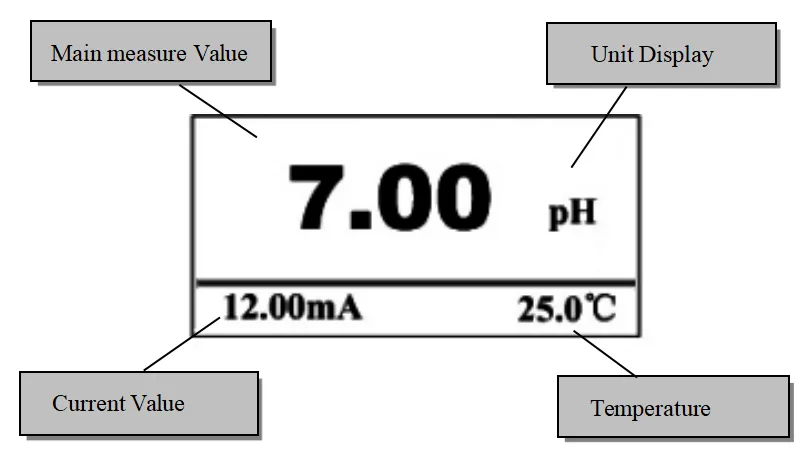
Note: Under main interface through press “  ”to shift to browsing interface,no need to enter 'Menu Option' interface, it could browse setting value.
Browsing interface
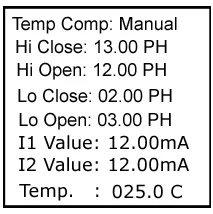
Note: Browsing interface through press“  ”could check
parameter state in turn, through press “  ”return to main interface.
Main Menu Interface

Under main interface, press “ ” key to enter user login interface, after input password “ 0000 ” to press “
  ”to enter “ Menu Option ” interface, this interface menu instruction as follow:
|
No.
|
Menu Name
|
Menu content instruction
|
|
1.
|
Parameter
|
Set probe type and compensation
|
|
2.
|
Relay & Alarm
|
Set pH or ORP High/ Low set point and Relay delay
|
|
3.
|
4-20mA Output
|
Set pH or ORP transmission capacity start range transferring
|
|
4.
|
PID control
|
To actuate and control powered variable value through 4-20 mA output (Optional)
|
|
5.
|
Modbus RS485
|
Set communication baud speed and address
|
|
6.
|
Backlight option
|
Set back light normal ON, delay off and dimming
|
|
7.
|
Factory reset
|
Recovery the instrument parameters to factory setting
|
|
8.
|
Calibrate
|
This menu only open when select pH probe
|
|
9.
|
Password change
|
Reset login password
|
Parameter Interface

Note: press “  ” or “
 ” to select “ Probe type ” or “ Temperature compensation” parameter setting,press “
  ” to enter.
Relay & Alarm Interface

Note: press “  ” or “
  ” select “ High Set Point ” , “ Low Set Point ” or “ Relay delay ” parameter interface,press “
  ” to enter.
4-20mA output Interface
Note: press“  ” or “
  ” input parameter value,press“
  ”to save.
PID Control Interface
Note: Press “  ” or “
  ” to select and enter into“PID ON/OFF”,“Output Port” and “PID Parameter”, press “
  ”to save.
Modbus RS485 Interface
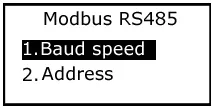
Note: Press “  ” or “
  ” to select, press “
 ”to save.
Back light option
Note: Press “  ” or “
  ” to select and enter into “Delay off ”, “ Normal on” or “ Dimming ”, if select “Delay off”, then need to input '“Set Time”, if select “ Dimming ”, then need to input “ Brightness ”, press“
  ”to save.
Factory Reset Interface

Note: Press “  ” or “
  ” to select “ Yes ” or “ NO ”, press“
  ” to save.
Factory default parameter
|
Menu name
|
Setting range
|
Factory parameter
|
|
Probe type
|
PH/ORP probe
|
PH probe
|
|
Temp. comp
|
Auto/manual
|
manual
|
|
Manual temp.comp value
|
0 ~ 120 ℃
|
25 ℃
|
|
High alarm close value
|
pH: 0.00 ~14.00
|
pH: 13.00 pH
|
|
ORP:- 1200 ~ + 1200 mV
|
ORP:+ 1200 mV
|
|
High alarm open value
|
pH: 0.00 ~ 14.00
|
pH: 12.00 pH
|
|
ORP:- 1200 ~ + 1200 mV
|
ORP:+ 1100 mV
|
|
Low alarm close value
|
pH: 0.00 ~14.00
|
pH: 2.00 pH
|
|
ORP:- 1200 ~ + 1200 mV
|
ORP:- 1200 mV
|
|
Low alarm open value
|
pH: 0.00 ~14.00
|
pH: 3.00 pH
|
|
ORP:- 1200 ~ + 1200 mV
|
ORP:- 1100 mV
|
|
Relay delay time
|
0-99S
|
0
|
|
4mA value
|
pH: 0.00 ~ 14.00
|
pH: 0.00 pH
|
|
ORP:- 1200 ~ + 1200 mV
|
ORP:- 1200 mV
|
|
20mA value
|
pH: 0.00 ~ 14.00
|
pH: 14.00 pH
|
|
ORP:- 1200 ~ + 1200 mV
|
ORP:+1200 mV
|
|
PID Control
|
ON/OFF
|
OFF
|
|
Set Point
|
0-14ph
|
7PH
|
|
PID Value
|
P: 0-500
|
P: 0.5
|
|
I: 0-9999
|
I: 300 S
|
|
D: 0-9999
|
D: 10 S
|
|
Control Cycle
|
1-9999
|
0005 S
|
|
PID Direction
|
Forward / Reverse
|
Forward
|
|
User password
|
0 ~ 9999
|
0000
|
|
Backlight
|
Normal ON/Delay
|
Delay
|
|
Delay time
|
0 ~ 99 S
|
60 S
|
Calibration Interface
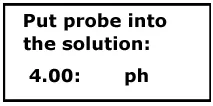
Note: When put probe into the solution, the controller display current measured solution PH value. This part operation refer to “ PH controller calibration“ part.
Password Change Interface

Note: Input new password , press“  ”to save.
Maintenance
1.PH part
1)Maintenance of instrument
The input terminal of instrument (insert port of probe) should be keep dry and clean, avoid dust and moisture invade.
It is not allowed to put the probe in protein solution and acidic fluoride for long time, avoid touch with silicone oil.
After long time use, if we found the slope is lower, it could be put the probe into 4% HF solution(hydro fluoride acid) 3-5 seconds, and then clean with distilled water, then dip into 0.1mol/L hydrochloric acid, that will renew the probe.
To measure more accurate, the probe should be calibrated periodically and wash with distilled water.
The instrument should be installed at a dry place or in a electric cabinet, to avoid water drop spatter or wet which will cause leakage of electricity or measure errors.
2)Calibration of instrument:
Before calibrate, check if the wire connection of instrument is correct or not, power on and wait 20mins.
Prepare three kind of standard solution:4.00pH, 6.86pH 9.18pH
Clean the probe with distilled water and dry with filter paper, put the probe into standard buffer solution 4.00PH, mix it slowly till the display value is steady.
Through the menu to enter probe calibration interface, the screen display '4.00PH calibration', in the middle it display probe output pH value, till the pH value is steady and press ' ENT ' key to operate calibration, when calibration finished successfully it will indicate success.
Repeat the upper two steps, calibrate the 6.86 and 10.01PH. After finish each step calibrate, probe should be cleaned by distilled water and dry with filter paper, then it can be put into the next solution to calibrate.
2.ORP part
1)Preparation one kind of ORP standard solution 470mV (240mV or others optional), in order to improve the measuring accuracy, the calibration solution mV value need to close to the measuring value.
Clean the probe with distilled water and dry with filter paper, put the probe into standard buffer solution 470mV (240mV or others optional) mix it slowly till the display value is steady.
Through the menu to enter probe calibration interface, the screen display '4.00PH calibration', in the middle it display probe output pH value, till the pH value is steady and press ' ENT ' key to operate calibration, when calibration finished successfully it will indicate success.
2)ORP probe checking:
Not like pH probe need be calibrated by standard solution, the ORP probe need to use standard solution to check, the most important is to check if the probe is workable or not.
Clean the probe with clear water and dry it with soft towel.
Put the ORP probe into the mV standard solution which is prepared. wait till the reading is steady.
Watch the display value is close to mV standard solution or not, if the errors is within range ±35mV, the electrode could be used otherwise it need to be replaced.
4-20mA current output formula
1.PH Current output formula:
Factory setting define output current value is :0 pH is corresponding value of 4 mA; 14 pH is corresponding value of 20 mA.
I = ( D - 4 mA corresponding value)× ( 16 / (20 mA corresponding value- 4 mA corresponding value) ) + 4.00
I = ( D - 0 )× ( 16 / 14 ) + 4.00
Note: I is output current value 4 mA≤I≤20 mA
D is pH value displayed by the instrument 0.00pH≤D≤14.00pH
2. Formula of ORP current output:
Factory setting define the output current is :-2000mV is corresponding
value of 4 mA; +2000mV is corresponding value of 20 mA.
I = ( D - 4 mA corresponding value )× ( 16 / (20 mA corresponding value - 4 mA corresponding value) ) + 4.00
I = ( D – (-2000) )× ( 16 / (+2000 – (-2000)) ) + 4.00
I = ( D + 2000 )× ( 16 / 4000) ) + 4.00
Note:I is output current value 4 mA≤I≤20 mA
D is ORP value displayed by the instrument -2000mV≤D≤+2000mV
Fault Judgments and Trouble Clearing
(1)No display of the controller?
Answer: the power is not well connected or blown fuse. Check the power supply line and fuse.
(2)Value can be displayed but not stable ?
Answer: Probe cable is wet or ceramic of probe is polluted. Check probe cable, clean ceramic core(0.1mHCL).
(3)Solution PH4.00 and PH6.86can not be adjusted ?
Answer: Outside of probe is polluted, probe cable is wet, probe is broken or there is cracks, ceramic core of probe is blocked. Clear probe (0.1mHCL), check the probe cable, replace probe, clean ceramic core (0.1mHCL).
(4)Numbers response slow ?
Answer: thin film of probe or ceramic core is polluted. Clean the whole probe.
(5)The actual pH value change a lot but the instrument display pH value change very small?
Answer: ceramic core of probe is blocked, probe fall off/perish, slow response. Clean probe (0.1mHCL), use recovery solution.
(6)Display value of instrument not change ?
Answer: Probe broken, probe cable short circuit. replace probe, check probe cable.
(7)Relay not active or pH value not change after dosing chemicals ?
Answer: Relay broken; wrong setting of the instrument and chemical solution is not enough. Contact supplier to replace relay, change settings, add chemical solution.
Complete Instrument
|
PH Controller
|
1pc
|
|
PH probe
|
1pc
|
|
Fixed clamp
|
1pair
|
|
Operation manual
|
1pc
|
|
Calibration solution
|
1set
|
